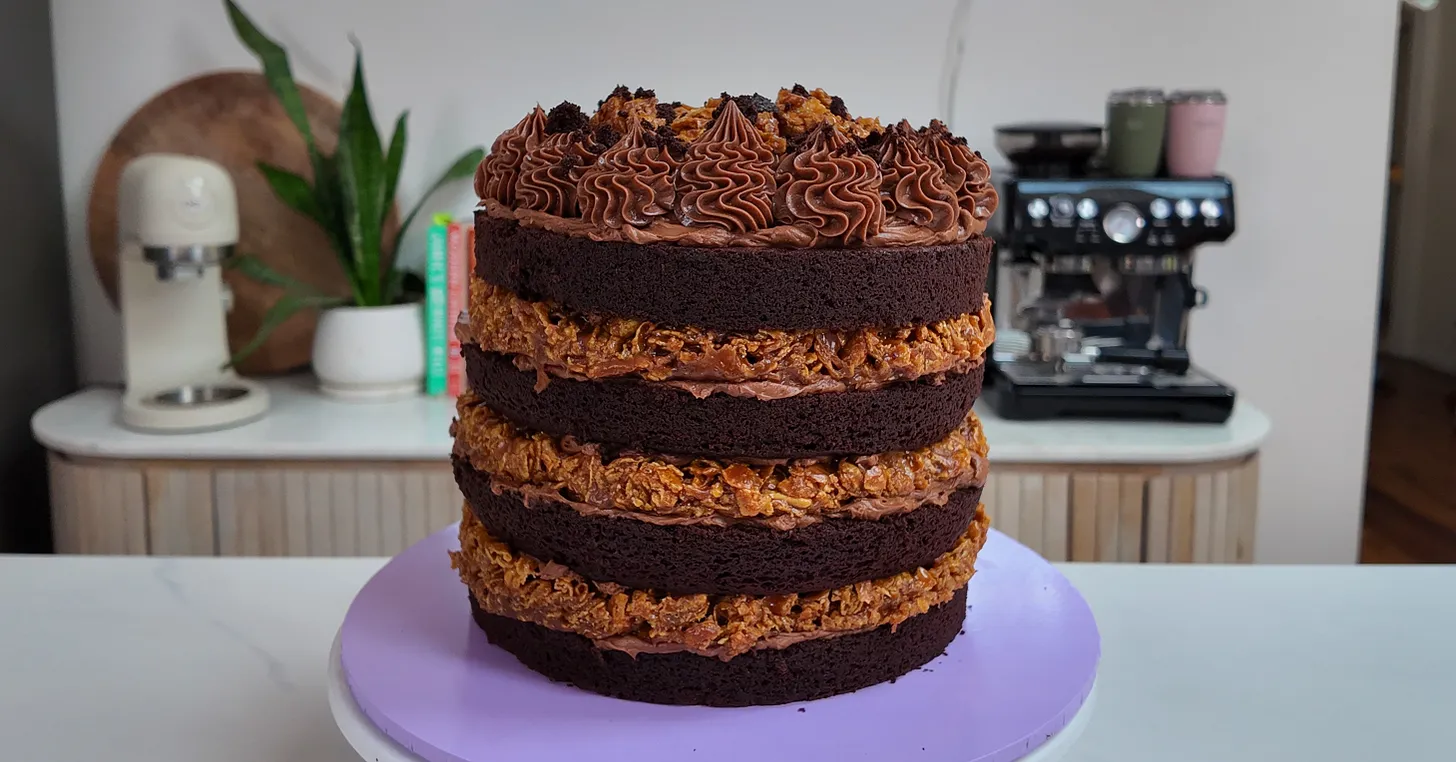


I have had literally THOUSANDS of requests for this recipe and I’m finally here to share her in all her glory!
This is no ordinary cake. In fact, this is probably the most extra cake I have ever created 🙀🙀🙀 which is no surprise considering it has now racked up over 10 million views on Instagram alone.
Why you’ll love this cake…
This cake is BIG. 3 thick layers of caramel cornflakes, 4 layers of beautifully soft and moist chocolate cake, and the dreamiest whipped buttery milk chocolate ganache. The whipped ganache is honestly more like a chocolate mousse silky, light, rich, and completely irresistible.
I’ve made a few tweaks from my original smaller recipe and this version is now bigger, better, and even more delicious than ever. It’s crunchy, creamy, chocolatey and absolutely worth every second it takes to make!
This is the kind of cake people talk about long after the last slice is gone.


Recipe FAQs:
Yes absolutely! You can bake this cake a day ahead of time and store it in the fridge overnight. Allow it to sit at room temperature for at least half an hour before serving (longer on colder days). You could also bake this cake over 2 days.
Bake the cakes, make the ganache and caramel cornflakes on the first day. Then assemble on the second day. Wrap the sliced cakes in glad wrap and store in the fridge or freezer. Cover the surface of the ganache in glad wrap and store in the fridge over night, allow to sit at room temperature for around 30 minutes before whipping. Wrap the cooled tray of caramel cornflakes in glad wrap and store in the fridge overnight.
No! I like to whip mine as is gives it a beautiful silky, lighter texture but it’s still gorgeous without whipping, just a little thicker.
Yes, but you’ll need to adjust the baking time. The recipe is designed for two 20cm (8-inch) cake tins.
Yes you can. Although, the coffee doesn’t make the cake taste like coffee, it simply enhances the chocolate flavour. If preferred, replace it with the same amount of boiling water.
If you accidentally add too much cream at once and your sugar seizes don’t panic! Before adding the butter, place the pot back over a medium heat and continue mixing until the sugar melts. Once the suagr has melted and the caramel is smooth, continue on with the recipe.
The short answer is no. The key to getting the caramel right is heating it to 116°C, when the sugar reaches soft ball stage. At this stage the sugar is concentrated enough to hold its shape when cooled, but will still remain perfectly chewy and pliable without becoming to hard.
If you don’t heat the caramel enough it will be too runny and overly sticky, if you heat it too much the caramel will become hard when set. Candy thermometers are actually really easy to find and you can pick one up for a really affordable price, mine is just from look sharp.
No! As long as you make sure to coat the cornflakes completely in caramel they won’t go soggy at all!
This is probably my most asked question and my answer is always just a big sharp knife. Obviously this cake is huge and has lots of layers but it still slices in the most epic layers of cake!
It probably hasn’t chilled long enough. It should be firm but not rock hard before whipping.
Absolutely. Use a good-quality eating chocolate rather than baking compound chocolate for the best flavour and texture.
You can either use a serrated knife e.g. a bread knife or a cake leveler. I have a wire cake leveler and it is super handy, you can pick one up in most baking/home stores.
💕 Loved this recipe? 💕
If you loved this recipe I would absolutely love you to tag me on Instagram and feel free to leave a review below 🥰

The Caramel Cornflake Cake
Equipment
- 2 x 8 inch cake tins
- candy thermometer
- piping bag
- open star nozzel
- cake board/cake plate
- large tray 42cm x 30cm doesn't need to be this exact size
Ingredients
Chocolate Cake
- 150 g cocoa powder
- 360 g hot strong coffee* I used 2 double shots of espresso and boiling water but you could mix 3 teaspoons of instant coffee in 360g of boiling water.
- 180 g neutral oil vegetable or canola
- 600 g caster sugar
- 3 eggs
- 300 g plain flour
- 1 tsp baking soda
- 2 tsp baking powder
- 250 g plain yoghurt
- 2 tsp salt
Caramel Cornflakes
- 750 g caster sugar
- 500 g cream
- 2 tsp salt
- 250 g butter
- 300 g cornflakes
Whipped Buttery Milk Chocolate Ganache
- 750 g milk chocolate I always use Whittaker’s Creamy Milk
- 375 g butter
- 375 g cream
Instructions
Chocolate Cake
- Preheat your oven to 170ºC (conventional oven). Grease 2 x 20cm cake tins and line the bottoms with baking paper.
- In a mixing bowl, start by whisking together the hot coffee and cocoa powder until it is silky and glossy. Allow to cool to room temperature (5-10 mins)
- Whisk in the oil, sugar, then eggs, one at a time, until combined and glossy.
- Sieve in the baking soda, baking powder, salt and plain flour, and whisk to incorporate. Finally, mix in the yoghurt and pour 1kg (1000g) of cake batter into each of the cake tins (weighing them will ensure you have lovely even cake layers). Tap each cake tin firmly on the bench a few times to release any air bubbles. (You will have a little cake batter left; see step 6 for what to do with this.)
- Bake the cakes for 50 minutes or until cooked through. They should spring back when you press on the top. Pop a skewer/knife into the middle, if it comes out clean or with just a few crumbs, it is ready. Allow to cool for 30 minutes in the tins, then flip the cakes out onto a sheet of baking paper and allow to cool fully. Slice each cake in half ready to assemble.
- Pour the small remaining amount of cake batter into any size cake tin or tray and bake until cooked through. I would recommend doing this after your cakes are cooked and out of the oven as you don’t want to be opening the oven lots while the main cakes are cooking. Once the cake is cooked, crumble it onto a tray lined with baking paper, switch off the oven and pop the tray of crumbs back in to dry out and become crispy (about 10 mins). Allow to cool and set aside for decorating.

Caramel Cornflakes
- Place the sugar in a large, heavy-bottomed pot on a low to medium heat until it has fully melted and is a rich amber colour. Try not to stir the sugar too much during this process, you can use a wooden spoon or spatula to gently pull the melted sugar into the centre to help it melt evenly.
- Remove the pot from the heat and whisk in the cream, start VERY slowly at first adding a splash at a time to avoid the caramel seizing. It will steam up quite a lot at the beginning so make sure to be careful. Once all the cream is incorporated, stir in the salt and butter. Once the butter has melted, return the pot to the heat with a candy thermometer. Watch and stir regularly until the caramel reaches 116°C (240.8°F). This may take around 15 minutes.
- Have the cornflakes ready in a large heatproof bowl. Once the caramel reaches temperature, gently pour the caramel over the cornflakes and stir to completely coat (very important they are completely coated!).
- Push the cornflakes firmly into a large tray (42cm x 30cm)* lined with baking paper (be careful as the cornflakes will still be HOT).

- Once fully cooled, cut out 3 x 20cm circles of caramel cornflakes, use the base of the cake tin to help you. (Because of the size of my tray, I cut 2 full circles, then cut 2 half-circles and pressed them together for the final layer).
- Break up the cornflake offcuts into chunky pieces and set aside for decorating.
Whipped Buttery Milk Chocolate Ganache
- Break up the chocolate and place it into a large heatproof bowl along with the butter. Melt together over a bain-marie while gently stirring with a spatula until fully melted.
- Remove the bowl from the heat, pour in the cream and mix quickly with a spatula until incorporated and glossy.
- Cover the surface directly with glad wrap and pop the ganache in the fridge to set. If making ahead of time, keep stored in the fridge, but remove the ganache about 30 minutes prior to whipping to allow it to soften slightly.
- In your stand mixer or with electric beaters, whip the ganache for a couple of minutes until light and fluffy.
To Assemble
- On a cake board or plate, smear a small amount of ganache (this helps stick the first layer of cake in place). Place a layer of chocolate cake onto the board then add a large dollop of ganache. Spread the ganache evenly over the cake using an offset spatula, the more even your ganache is in each layer, the more even your cake will be at the end.
- Next, place a layer of caramel cornflakes and again spread a dollop of ganache evenly on top. Repeat with the remaining layers alternating caramel cornflakes and chocolate cake. Your final layer should be chocolate cake. Dollop a generous spoonful of ganache on the top and spread rustically over the top surface.
- Place the remaining ganache into a piping bag lined with a large open star piping tip. Pipe ruffles around the top of the cake. Fill the centre with your cornflake off-cuts and sprinkle with crispy cake crumbs. Slice with a nice big sharp knife and enjoy.


Leave a Reply